
What does kfb mean?
WHAT does KFB Mean?
*rubbing my hands together in anticipation* I loooooove tackling questions like this because there is a clear answer, but it also opens up the door to share more information! So here it goes.
Simply put, kfb means "knitting into the front and back of the same stitch, creating 2 stitches out of one". Wait, what? Into the "back" of the same stitch? Yes ma'am! Here's how to break it down:
How to KFB
Step 1: Knit into the front of a stitch as normal.

Step 2: Without dropping the stitch off the left hand needle, twist your right hand needle backwards, and knit into the BACK of the stitch (as if to knit through the back loop).


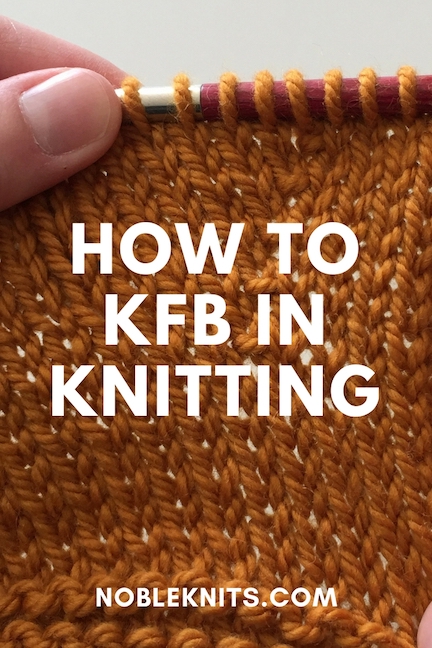
Step 3: Drop both loops off the left hand needle and voila! Two stitches from what once was one! (see that adorable little purl bump 6 stitches to the left of my pointer finger???)

Why use kfb as an increase method?
Kfb is a method of making 2 stitches from 1. You don't create a stitch out of nowhere like with a M1R or M1L (make 1 right/left slanting) or a yarn over, you actually need a stitch in which to create your new stitch.
The biggest pro of using the kfb method is that you get no holes, no pulling of your work, and they're almost invisible. I say "almost" because they aren't quite.
The anatomy of the kfb: knitting through the back loop, after already having worked into the front of the loop, produces what looks like a purl bump immediately to the left of your knit stitch. I like to think of this as a design element (it is very often used in the shaping of toe-up socks) and choose to relish the simplicity of the purl bump.
Just be mindful that, unlike a M1R or M1L (or even the humble yarnover) where you can easily create a mirrored increase, you need to adjust the kfb by one stitch to the right in order to keep your purl bumps mirrored.
For example, as in toe shaping on socks, your instructions will likely say:
Inc Row: K1, kfb, knit to last 3 sts, kfb, k2 (2 sts inc).
It looks like the kfb's are off center, right? They aren't! That purl bump is always to the LEFT of the knit stitch. So if you were to pick up the sock and look at it after working the above row you'd see what looks to be 2 knit stitches, a purl stitch, a bunch of knit stitches, a purl stitch, followed by 2 knit stitches. If you're looking for symmetry in your knitting, adjust that left kfb so you end up with the same number of sts before and after the purl bump!
Recommended Posts
But I have a solution for you!
You didn't think I'd leave you without a solution, did you? C'mon...
If you aren't a purl-bump lover like I am, there's a way to ditch that bump that makes the stitch pretty much invisible! And while I'd like to take credit, one must give credit where credit is due: say a hearty "Thanks" to Meg Swanson for bringing this technique to our attention. She doesn't claim to have invented this technique but is certainly hailed as its recent spotlight-er of the technique. Here's how to do it:
Step 1: Knit into the front of the stitch as normal.
Step 2: Without dropping the stitch off the left hand needle, twist your right handle needle backwards, and insert your right hand needle into the BACK of the same stitch. DO NOT wrap the yarn to knit. Simply drop both stitches off the left hand needle without knitting the second stitch.
In a newsletter that Meg released, she breaks this technique down visually, using two colors. I think you'll find it quite helpful:
https://www.schoolhousepress.com/media/wysiwyg/newsletter/08_Winter.pdf
Need video support?
In case you're a visual learner like me, I've included a video that shows both methods of working the kfb as outlined above - one that results in a purl bump, and one that doesn't!
And I want to know, now that you've tried both (at least I hope you've tried both), are you a purl-bump lover? Or do you prefer a more invisible increase?


